Daily Recipes
  • Home
  • All Recipes
    • Lunch
    • Dinner
    • Breakfast
    • Dessert
    • Appetizers
  • Privacy Policy
  • Contact Us
Daily Recipes
  • Home
  • All Recipes
    • Lunch
    • Dinner
    • Breakfast
    • Dessert
    • Appetizers
  • Privacy Policy
  • Contact Us
Author

Foodideo

Foodideo

All RecipesAppetizers

Baked Broccoli Cheese Balls

by Foodideo June 21, 2022
written by Foodideo

Broccoli can make a fun recipe too! These low-carb Baked Broccoli Cheese Balls are not only very delicious and super nutritious,  but they make a nice protein replacement. they are perfect to serve as snacks or appetizers at a gathering, these bites are loaded with broccoli, cheese, and spices.

Baked Broccoli Cheese Balls

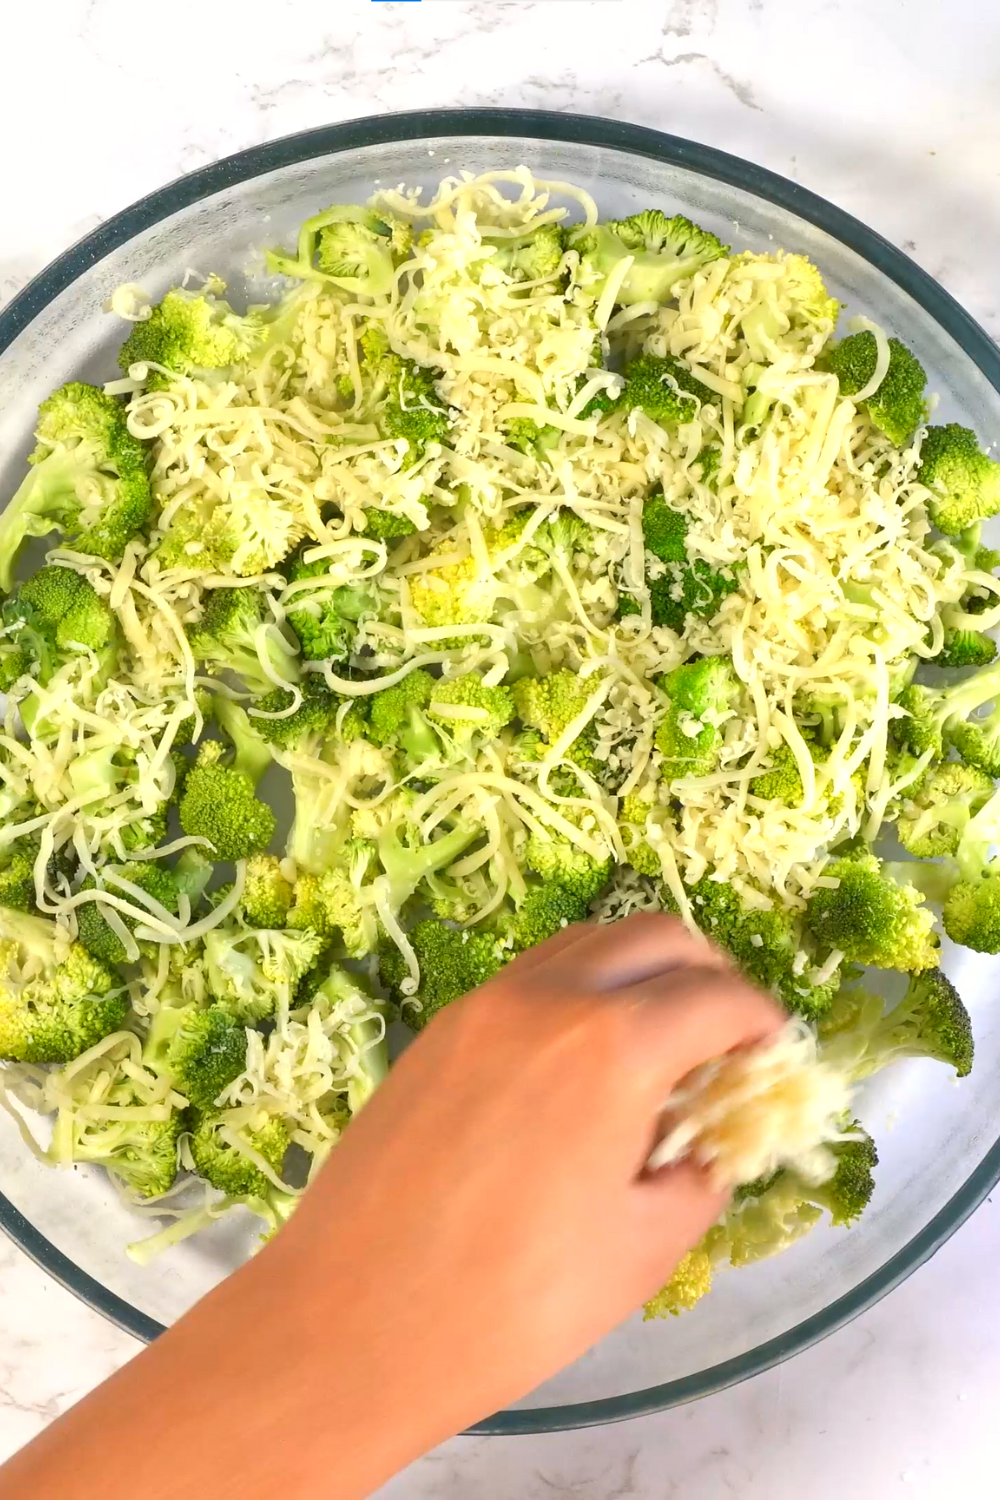
These delicious bites are super healthy even if they don’t taste like it, you will be using a lot of broccoli (very large head), they are baked, not fried. They can be used as a meat replacement, even if you’re not a big fan of broccoli you’ll find yourself scoffing them down, They are really juicy and moist from the inside.

These tiny broccoli balls are perfect superfoods, they’re super nutritious and full of vitamins, protein, and fiber.

The ingredients you will need

For this recipe, you will need a few basic ingredients that you can adapt to your taste.

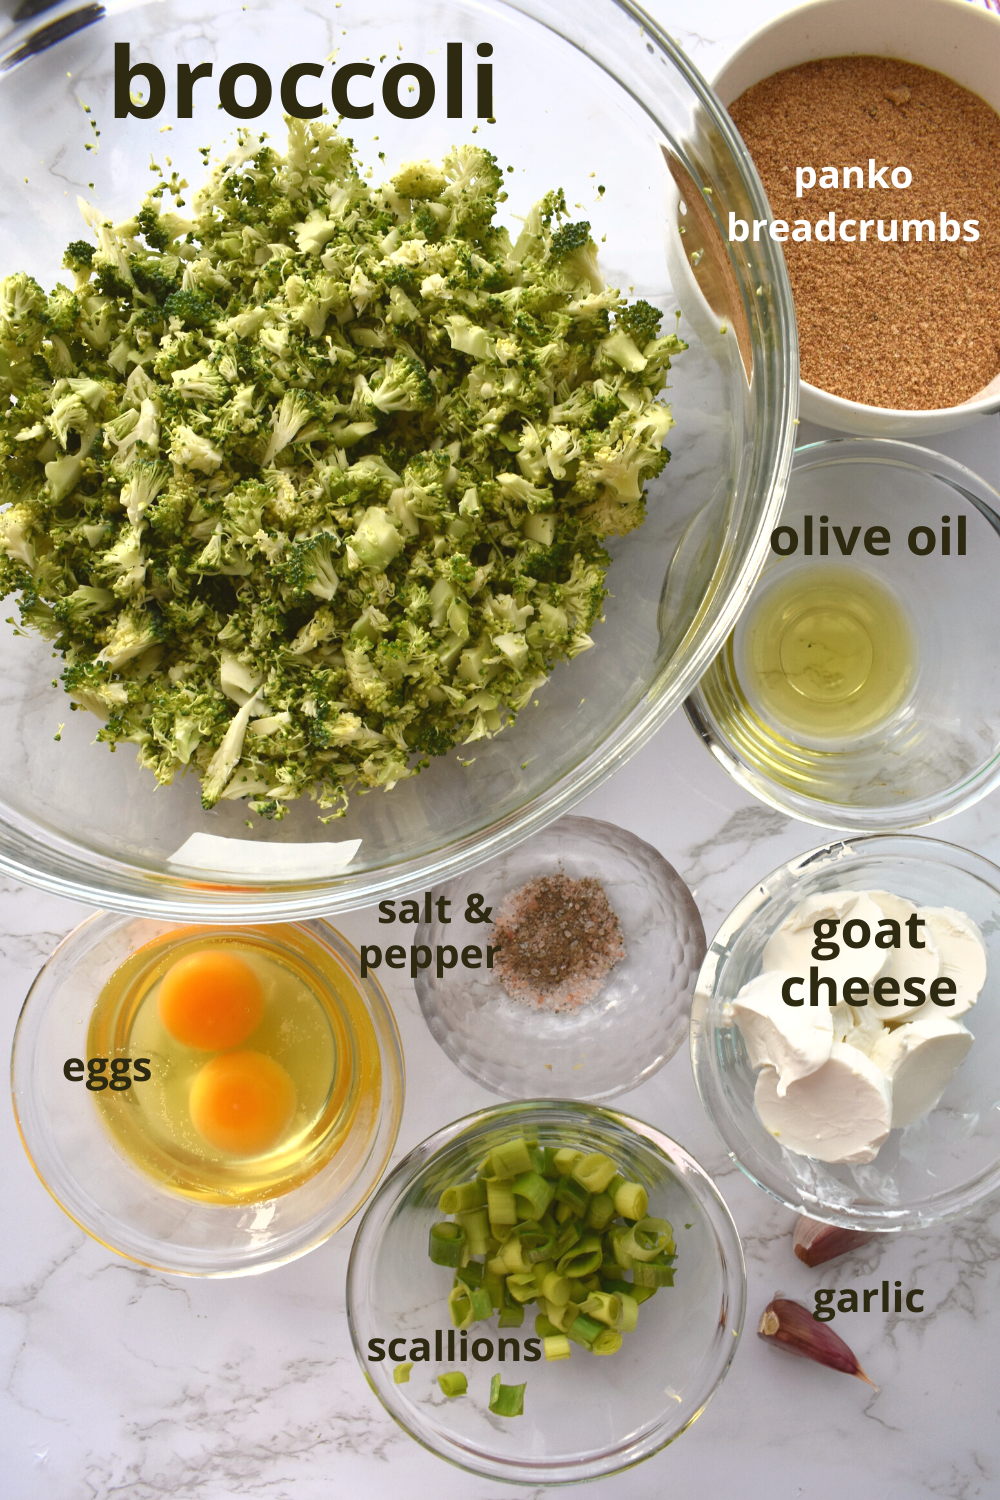
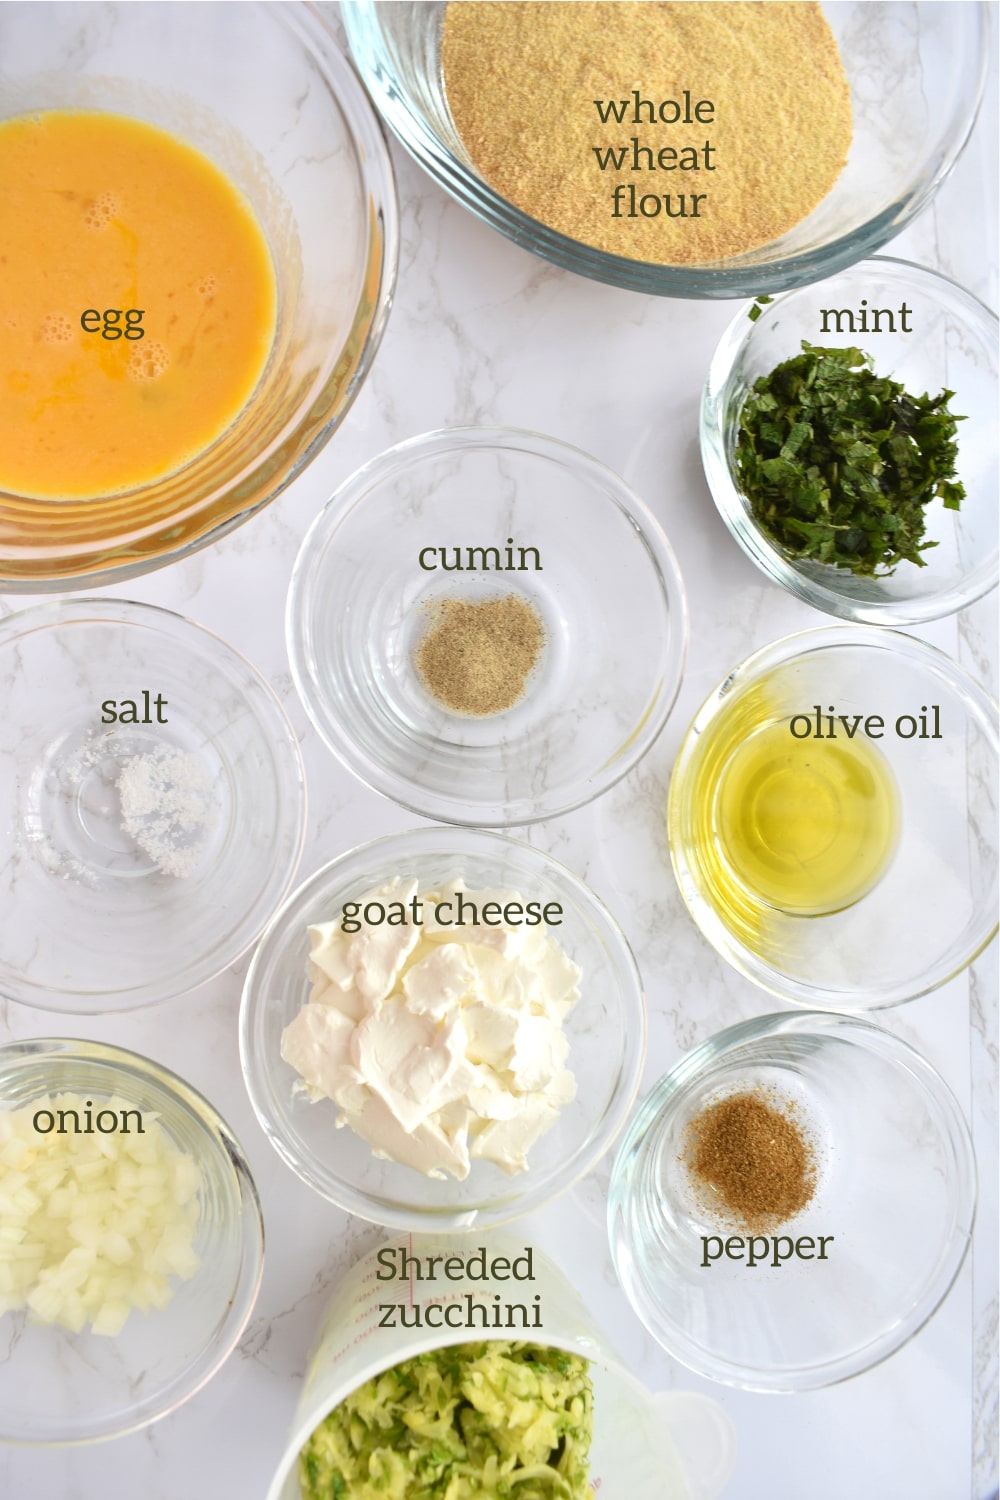
Broccoli: They can be either fresh or frozen broccoli.

Cheese: Cheddar, mozzarella, we used goat cheese for a healthier option.

Panko breadcrumbs: or Italian breadcrumbs, If you were looking for a low-carb friendly option use almond flour.

Egg: Large whole egg or flax egg for vegan.

Spices: keep it simple, salt & pepper are enough, you can add garlic too, or your favorite spice blend.

Onion: Chopped onion, shallots, or scallions (optional)

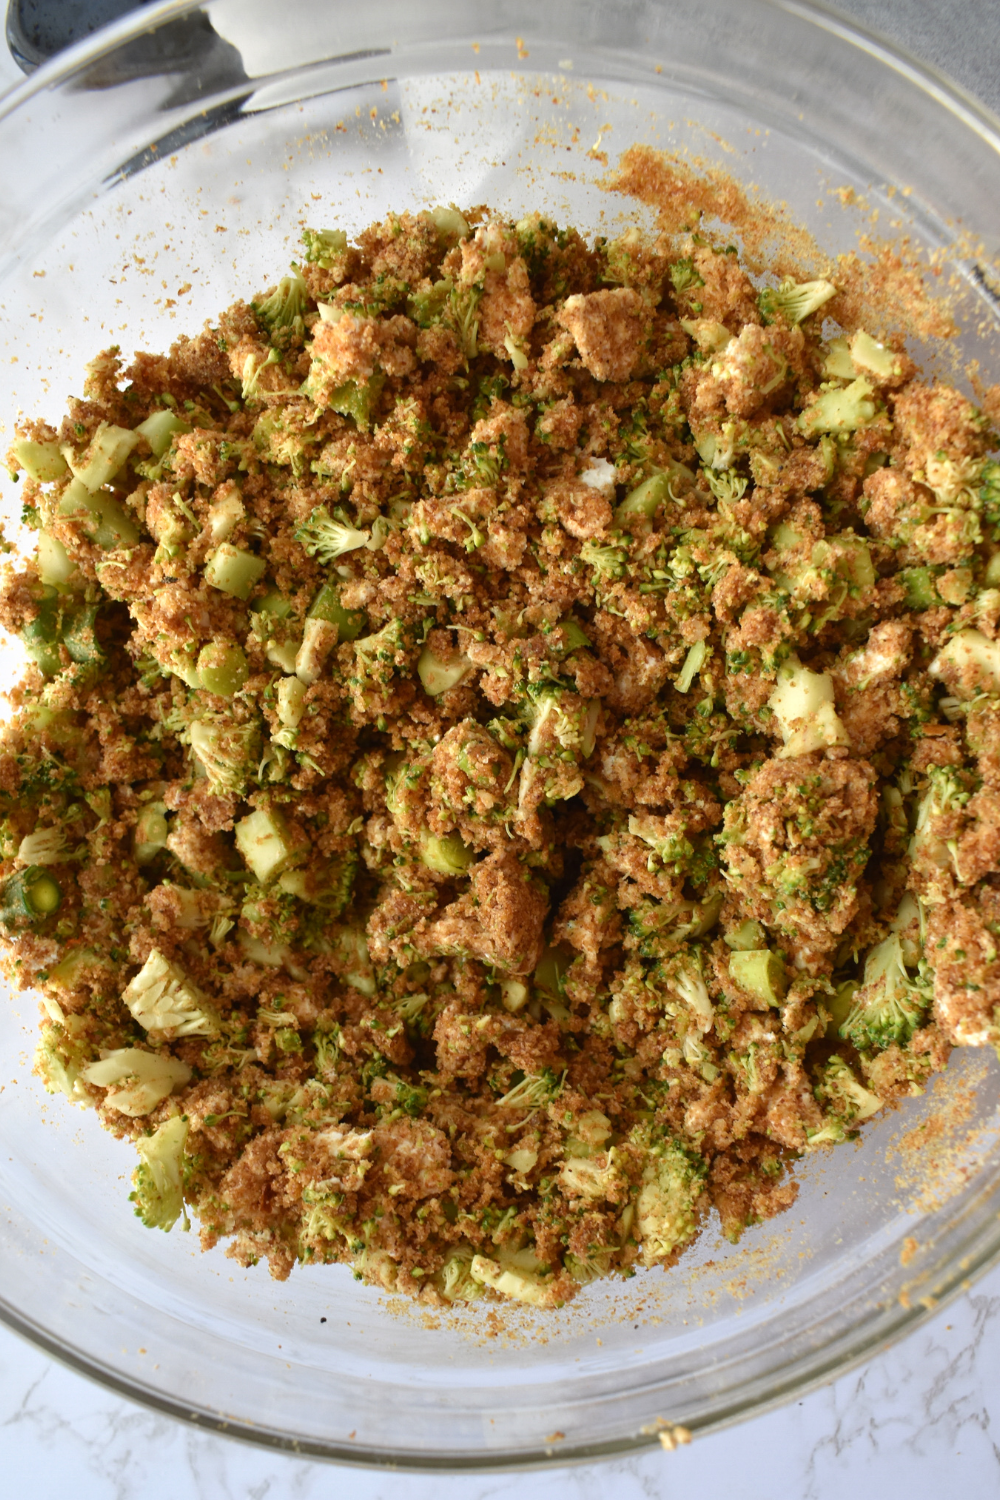
Mix everything In a large bowl.

How To Make Riced Broccoli

You can choose between these three options :

In the Food Processor: Pulse in a food processor and pulse for 15-20 seconds.

By Hand: You can rice the broccoli by chopping it with a knife until it is finely chopped.

Prepared:  you can find riced broccoli in the freezer aisle at your local supermarket.

Can You prepare Broccoli Balls ahead?

Yes! Keeping a batch of these healthy balls in the freezer means that you always have healthy snacks on hand and will not run out.

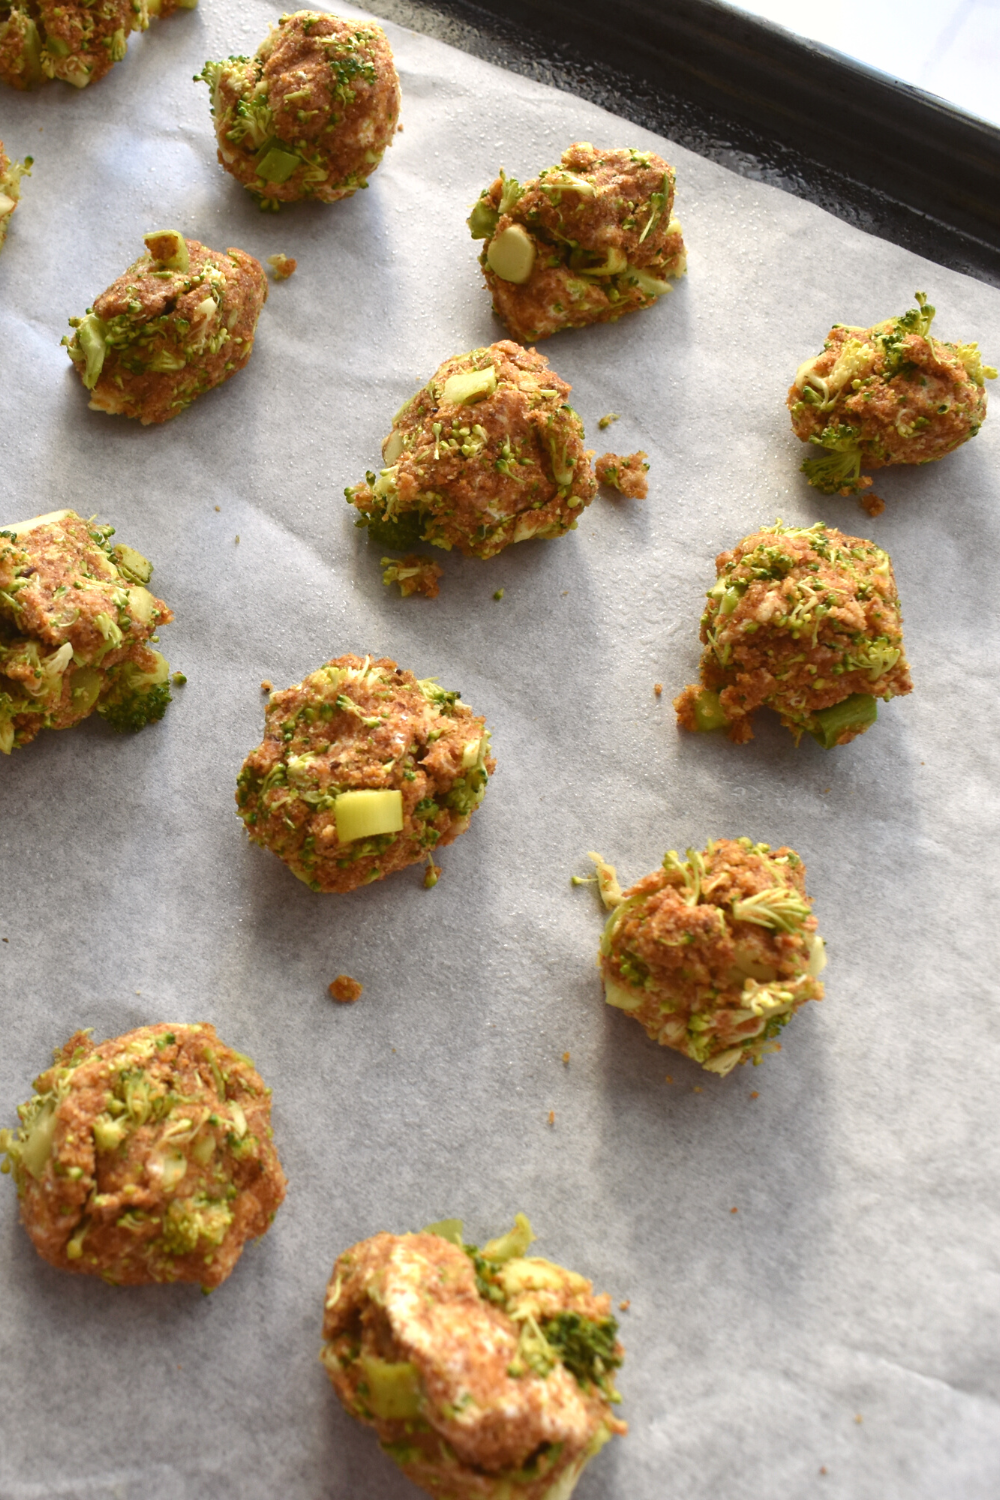
To freeze, spread the uncooked broccoli balls on a parchment-lined sheet pan, freeze for about 2 hours, then transfer to a large ziplock bag and freeze for up to 3 months. Put it directly in the oven from the freezer and bake. If desired, the balls can be frozen after baking.

To Reheat, After baking, place the leftovers in a closed container or wrap and refrigerate for up to 3 days. To reheat leftovers and cooked balls, heat in the microwave or toaster until warm.

The recipe is very simple, the balls are easy to shape and it is adapted to a low-carb diet making them even healthier!

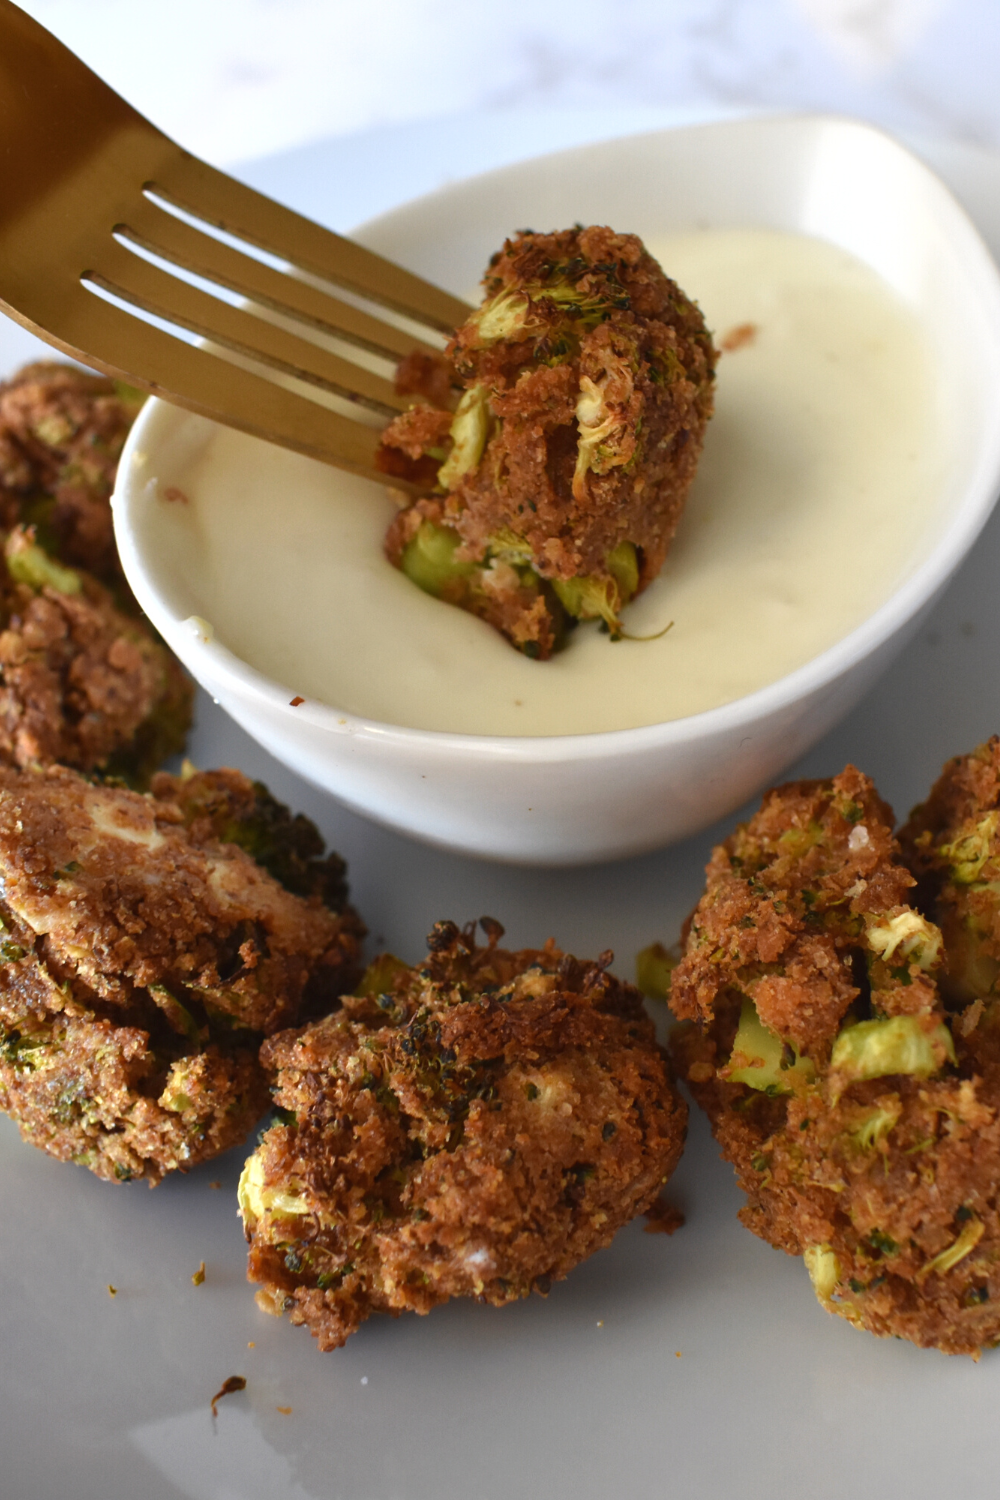
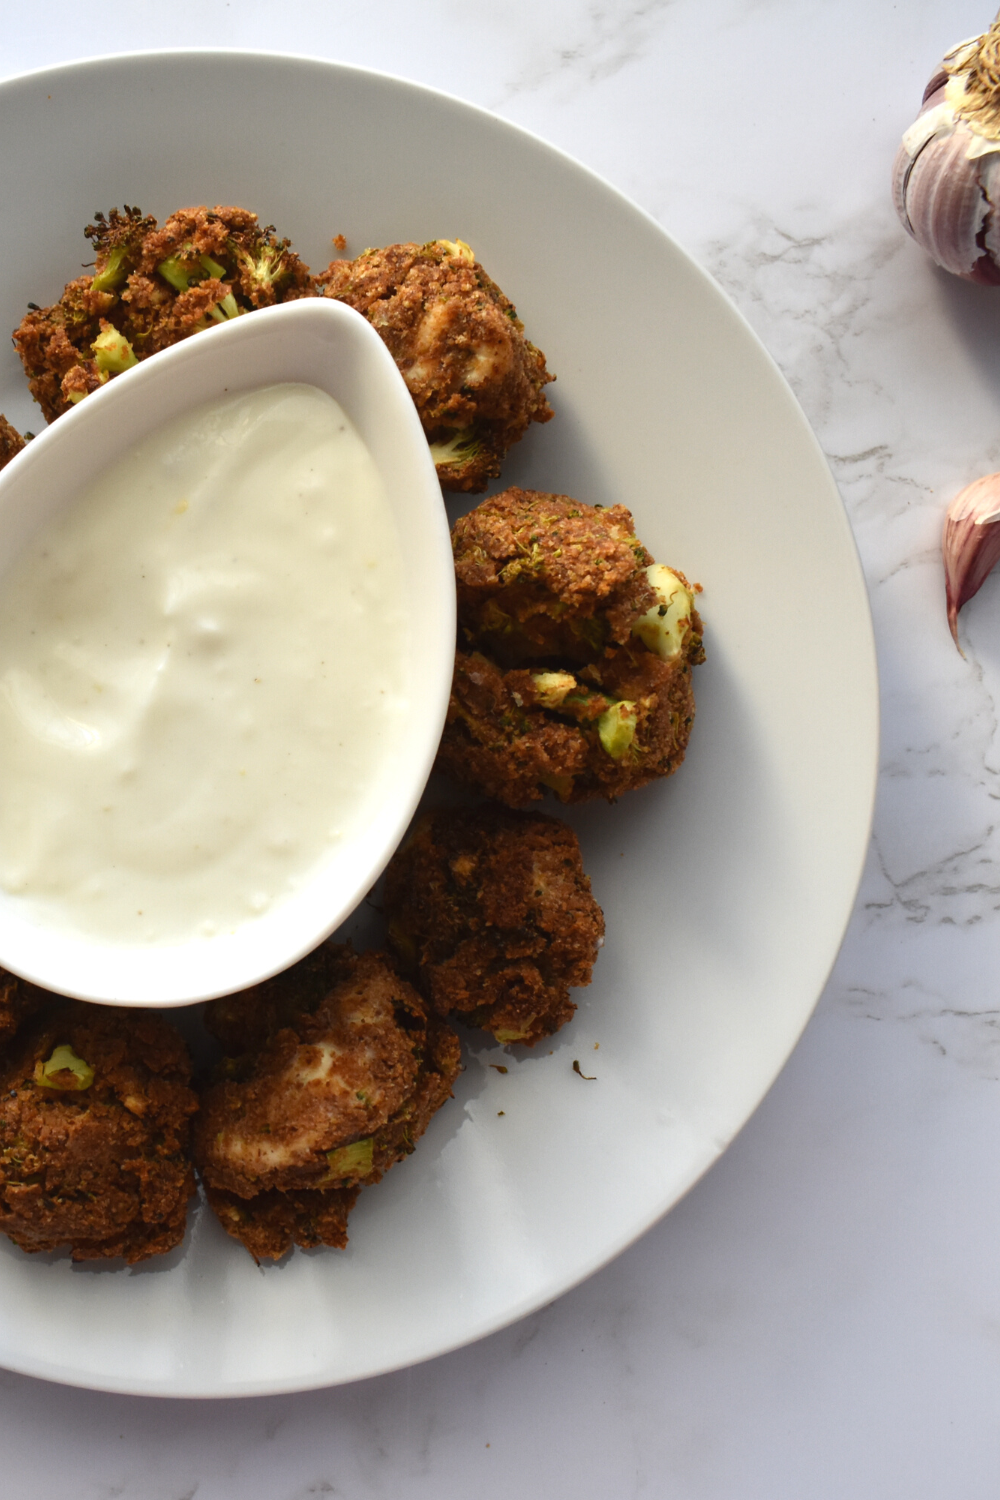
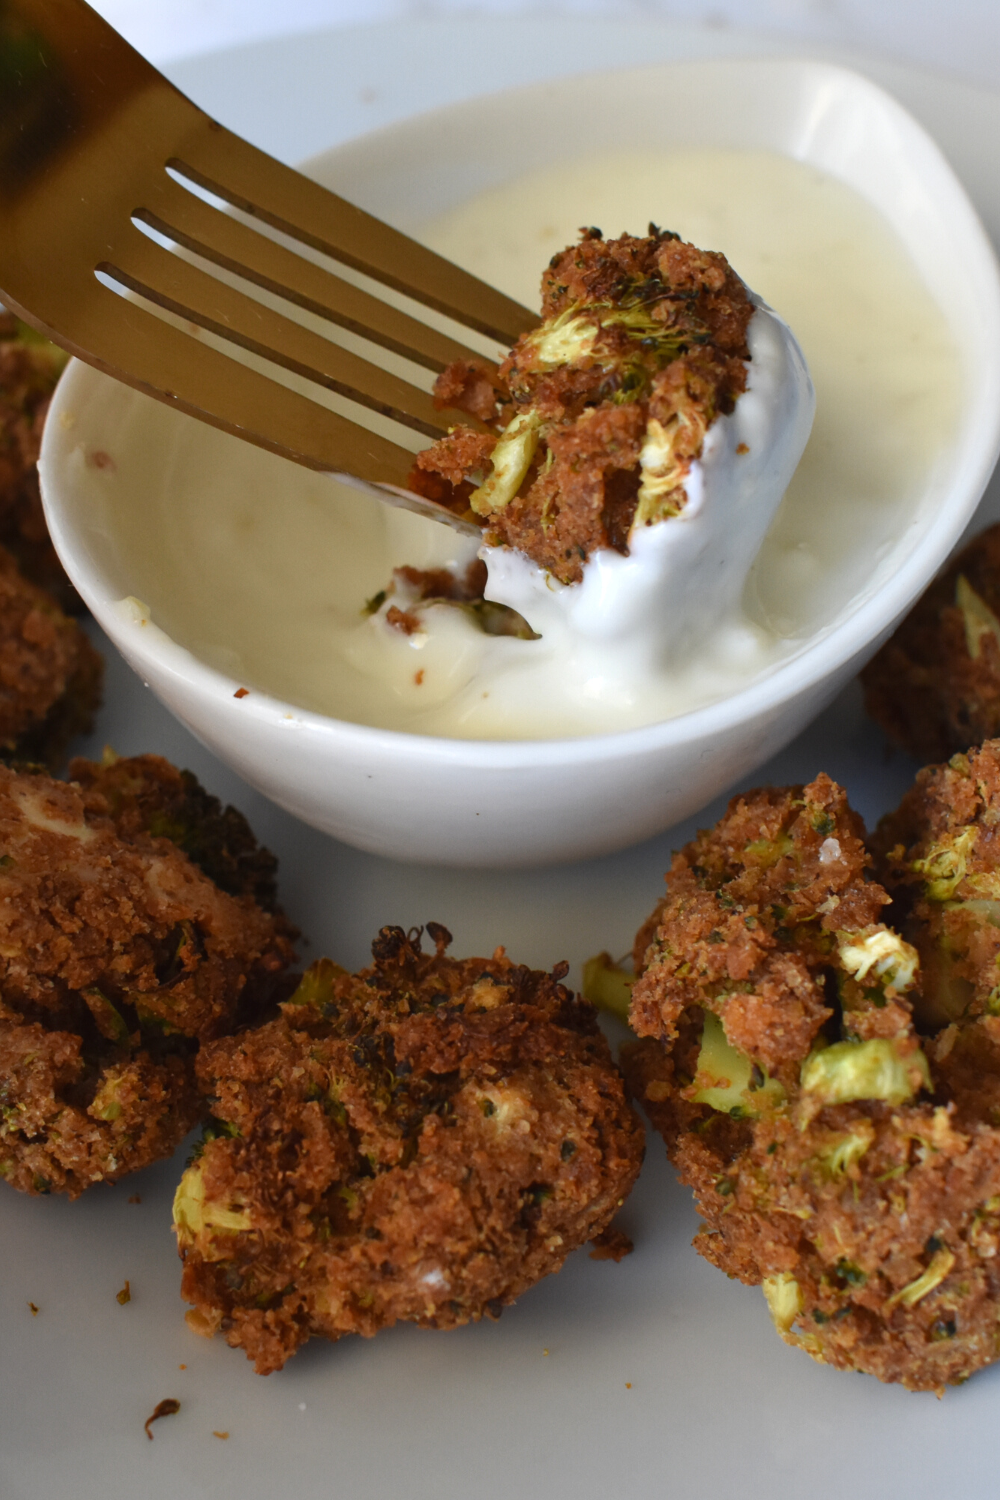
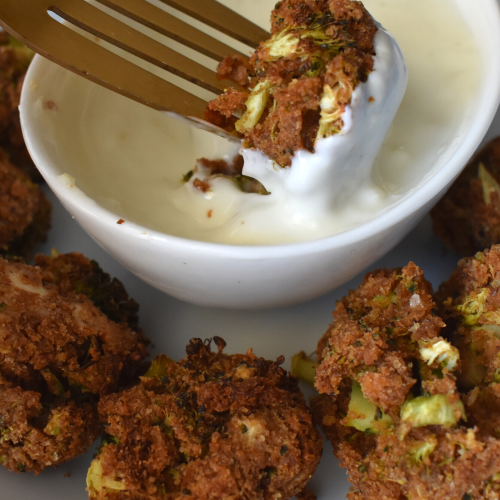
If you’re looking for easy, healthy, delicious appetizers for a gathering, then you have to try this recipe you can even prepare them ahead as they reheat well and people will love them! We recommend serving them with a garlic lemon yogurt sauce, find the recipe for the sauce and the baked broccoli cheese balls below!

Watch How to make Baked Brocolli Cheese Balls :

Baked Broccoli Cheese Balls

Broccoli can make a fun recipe too! These low-carb Baked Broccoli Cheese Balls are not only very delicious and super nutritious,  but they make a nice protein replacement. they are perfect to serve as snacks or appetizers at a gathering, these bites are loaded with broccoli, cheese, and spices.
Print Recipe Pin Recipe
Prep Time 15 mins
Cook Time 25 mins
Total Time 40 mins
Course Appetizer, Snack
Cuisine American
Servings 3 servings

Ingredients
  

  • 2 cups (packed) roughly chopped soft cooked broccoli (well drained) 
  • 1/2 cup panko breadcrumbs
  • 2 eggs
  • 3/4 cup shredded cheese or goat cheese
  • 2 Shallots / scallions  finely sliced
  • 2 cloves garlic minced
  • 1/4 tsp salt
  • Black pepper
  • Olive oil spray

GARLIC LEMON YOGHURT SAUCE:

  • 2/3 cup Plain yoghurt
  • Zest of 1/2 lemon
  • 1 tbsp lemon juice
  • 1/2 garlic clove minced
  • 2 tsp extra virgin olive oil
  • Pinch of Salt and pepper

Instructions
 

  • Preheat oven to 400 degrees F and line a baking sheet with parchment paper or foil.
  • Steam broccoli in boiling water or microwave until tender. Chop broccoli using a knife or food processor until finely minced.
  • In a large mixing bowl, combine the chopped broccoli, eggs, panko breadcrumbs, cheese, and spices. Mix until well incorporated.
  • Scoop about 1 tablespoon of mixture and form into a ball. Place on lined baking sheet and spray or drizzle lightly with oil. Bake 25-30 minutes or until lightly golden and cooked through. 
  • Serve on a salad, in a sandwich, with rice, or as an appetizer or snack with the garlic lemon yoghurt sauce. 

Video

Keyword baked balls, baked broccoli cheese balls, broccoli, healthy snack
Tried this recipe?Let us know how it was!
June 21, 2022 0 comment
0 FacebookTwitterPinterestEmail
All RecipesAppetizersDinnerLunch

GREEK LEMON POTATOES

by Foodideo June 16, 2022
written by Foodideo

Roasted potatoes never tasted so good! The special thing about this Greek Lemon Potatoes recipe is that it is baked while soaked in a rich flavoured lemon garlic broth, these potatoes then had all the time to really suck up those flavours while being roasted to golden perfection. You’ll never bake potatoes the same way again!

Greek Lemon Potatoes

Everybody loves a good greek recipe, and this recipe is not so different, these are not your usual roasted potatoes. It’s true that drizzling oil, salt, and pepper on your potatoes and then bake them will make a good side dish, but it’s never a bad idea to try new things every now and then, especially if they are tasty!

All you have to do is to follow a few extra steps than how you usually roast your potatoes, and that would make all the difference, you’ll end up making the crunchiest roast potatoes ever! They are thick, crusty, perfectly seasoned, and fluffy from the inside. These are the ingredients you’re going to need :  

How to make Greek Lemon Potatoes

How to cut the potatoes for this recipe

These potatoes are going to be cooked for quite a long time, so you have to make sure to cut them into chunky pieces so that they last long, you can cut medium potatoes into 3 pieces, and large potatoes into quarters or thick wedges.

Half braised, half roasted

The special thing about the Greek Lemon Potatoes as mentioned earlier is that it takes quite some time to cook, they are first braised in the lemon-garlic broth so that they suck up all that flavour, then you keep on roasting them until the liquid evaporates, leaving just the oil to roast the potatoes until golden.

It can be quite tricky to follow all these steps to roast the potatoes perfectly using only one pan. It is impossible to roast the potatoes whiteout the garlic burning. it’s either one or the other, golden garlic or golden potatoes. You will also end up with burnt ridges from the caramelised lemon juice and brow on the base of the pan.

This is the easiest, less risky way of making Greek Lemon Potatoes to have that golden result that you want: Braise in one pan then roast in another! First, you’ll braise in the first pan to suck up all the flavour, then transfer to a tray to bake until golden, drizzled with the flavoured oil from the first pan.

You’re free to skip the transference step.  Just keep in mind that your potatoes won’t look as golden as the ones in the picture, otherwise, you’ll end up with thin dark burnt ridges and the garlic with burn.

Note: Greek Lemon Potatoes are naturally not the crispiest type of potatoes recipe because they are submerged in lemon and broth, it is scientifically impossible for them to be very crispy, but this special tip given earlier, half braised, half roasted,  will help your potatoes have nice crispy edges and some crispy surfaces and in any case, you won’t miss major crunch factor because these have so much more flavour than any other roasted potato.

These potatoes are so good! You can’t stop once you start consuming them!

Watch How To Make It

GREEK LEMON POTATOES

What makes these potatoes taste really good is the lemon-garlic oregano flavoured broth, that the potatoes suck up, the potatoes are then roasted until golden and crispy! these potatoes are a good side dish that you can prepare for your lunch or dinner.
Print Recipe Pin Recipe
Prep Time 10 mins
Cook Time 1 hr 10 mins
Total Time 1 hr 20 mins
Course Side Dish
Cuisine Greek
Servings 5 servings

Ingredients
  

  • 2.5 lb Potatoes 
  • 1 1/2 cups Chicken stock/broth 
  • 1/2 cup Olive oil
  • 1/3 cup Lemon juice
  • 5 Garlic cloves  finely grated
  • 1 tbsp Dried oregano
  • 2 tsp Salt

Garnish

  • Lemon wedges
  • Fresh oregano leaves

Instructions
 

  • Preheat oven to 200°C/390°F.
  • Cut potatoes: Peel potatoes and cut large ones into 4 thick wedges and medium ones into 3.
  • Coat potatoes: In a pan, place the chicken stock, lemon juice, garlic, oregano, olive oil, salt then place potatoes, toss well.
  • Roast 45 minutes: Roast for 20 minutes. Turn potatoes, roast for a further 25 to 30 minutes until the liquid is mostly absorbed by potatoes/evaporated and you're left with mainly oil in the pan.
  • To crisp the potatoes (optional): Transfer potatoes to a separate tray. Tilt the original roasting pan and scoop off as much of the oil as you can, then drizzle over the potatoes.
  • Roast 35 minutes: Transfer potatoes to oven and roast for 35 – 40 minutes, turning once or twice, until potatoes are golden and a bit crispy on the edges.
  • Heat pan juices: Return pan #1 with the garlic juices to the oven for the last 5 – 10 minutes or so to reduce down and make the garlic golden.
  • Plate up: Transfer potatoes to serving platter. Drizzle over the reduced garlic pan juices (or toss potatoes in the pan). Serve, garnished with lemon wedges and oregano if desired. 

Video

Keyword baked lemon potatoes, baked potatoes, greek lemon potatoes, greek potatoes recipe, healthy potatoes, healthy potatoes recipe, lemon potatoes, potatoes
Tried this recipe?Let us know how it was!
June 16, 2022 0 comment
0 FacebookTwitterPinterestEmail
All RecipesAppetizersDinnerLunch

Air Fryer Tuna Croquettes

by Foodideo May 31, 2022
written by Foodideo

These crunchy tuna croquettes are budget-friendly, perfect appetizers or side dishes, made with canned tuna, potato, and parsley, that can be baked in the air fryer or the oven.

Canned tuna is mostly used for sandwiches or salades but tuna can also taste really good as croquettes, These tuna and potato croquettes are budget-friendly and super easy to make, and most importantly, they taste really good!

These croquettes are budget-friendly since they contain canned tuna and potatoes! Combined they make a tasty and easy lunch or dinner or even as a side dish or appetizers. Tuna croquettes are best served with a salad and lemon juice for the dressing and a tartar sauce for dipping.

WHAT ARE TUNA CROQUETTES?

Croquettes are a classic fried dish that can contain potatoes, meat, or seafood.  This recipe is like small cakes frilled with mashed potatoes and canned tuna. If you like to opt for a healthier version of croquettes, it is best to bread them and air fry them or bake them in the oven instead of frying them.

TUNA CROQUETTE INGREDIENTS

  • Tuna: Make sure the canned tuna is drained and flaked apart.
  • Potato:  boil the potatoes for 15 to 18 minutes. Then drain and mash.
  • Ingredients for Flavor: Parsley, red onion, lemon juice, salt, pepper, Dijon mustard, light mayonnaise.
  • Coating: Dip the croquettes in one beaten egg and then breadcrumbs.

AIR FRYER TUNA CROQUETTES

The best thing about air fryer recipes is that they deliver crunchier results than the oven, but both work for this recipe. Before cooking the tuna croquettes, make sure you spray them with olive oil so the breadcrumbs get crispy. If you’re opting for an air fryer, air fry for 10 min at 350 F degrees, and turn them halfway until they’re golden.

BAKED TUNA CROQUETTES RECIPE

This recipe can be both baked in the air fryer or in the oven at 375 degrees for 22 to 24 minutes, turning halfway.

VARIATIONS

  • Fresh Herbs – Swap the parsley for any fresh herbs, such as dill or chives.
  • Other canned fish –use canned salmon or sardines in place of fish, just don’t forget to remove any bones and drain the fish first.

HOW TO MAKE AIR FRYER TUNA CROQUETTES

TUNA CROQUETTES

These crunchy tuna croquettes are budget-friendly, perfect appetizers or side dishes, made with canned tuna, potato, and parsley, that can be baked in the air fryer or the oven.
Print Recipe Pin Recipe
Prep Time 10 mins
Cook Time 40 mins
Freezer time 10 mins
Total Time 1 hr
Course Appetizer, dinner, lunch, Side Dish, Snack
Cuisine American
Servings 4 servings

Ingredients
  

  • 2 5 Oz Canned tuna, drained and flaked apart
  • 1 large 10 ounce russet potato, peeled and cut into small cubes
  • 1/4  cup chopped parsley
  • 2 tbsp light mayonnaise
  • 2 tbsp minced red onion
  • 1 tbsp Dijon
  • 1 tbsp fresh lemon juice
  • 3/4 tsp kosher saltblack pepper, to taste
  • olive oil spray
  • 1 large egg, beaten
  • 3/4 cup plain or gluten-free panko
  • lemon wedges, for squeezing
  • tartar sauce, optional for serving

Instructions
 

  • Place the potatoes in a pan and cover with water. Cook on medium-high heat until potatoes are tender, about 15 to 18 minutes then drain.
  • Mash in a large bowl and combine with the tuna, parsley, mayonnaise, red onion, Dijon mustard, lemon juice ,and salt and pepper and place in the freezer for 10 minutes.
  • Place1/4 cup of mixture in hand and gently roll into 8 logs.
  • Place one beaten egg in a small bowl, and the breadcrumbs in another bowl.

Air Fryer Method:

  • Air fry 350F 10 minutes, turning halfway until golden and crisp.

Oven Method:

  • Bake in the oven 375F for 22 to 24 minutes, turning halfway until golden and crisp.
  • Serve with lemon wedges.

Video

Keyword air fried recipe, croquettes, paprika smashed potatoe, potato croquettes, tuna croquettes
Tried this recipe?Let us know how it was!
May 31, 2022 0 comment
0 FacebookTwitterPinterestEmail
All RecipesAppetizers

Zucchini and Goat Cheese Fritters

by Foodideo May 26, 2022
written by Foodideo

Zucchini and goat cheese, the perfect nutritious vegetable summer side dish to make great use of the zucchini and mint season.

ZUCCHINI AND GOAT CHEESE FRITTERS :

These fritters are served hot with a dollop of sour cream, plain yogurt, mushroom gravy, or as plain as they are. They would pair perfectly with anything you grill.

Since these zucchini fritters are fried, it’s best to use a couple of layers of paper towel to remove any excess frying oil.

These fritters are healthy, made with whole wheat flour or gluten-free flour mix, the zucchini fritters are then cooked in a skillet with a little olive oil until golden.

Zucchini makes a nutritious vegetable side dish or a yummy casserole.  If you are not a big fan of fried foods, then you can try baked zucchini fritters, by making this same recipe but instead of frying them in the pan put the mix in a casserole dish then place it in the oven for about 35 min, it is so yummy and healthful!

TIPS AND VARIATIONS:

  • Instead of mint, you can use fresh dill.
  • It is very crucial to squeeze out all the liquid from the zucchini so that they hold together without having any excess water leaking while frying them.
  • To make sure the center of the fritters cooks through, flatten the batter in the skillet with the back of a measuring cup.
  • It is best to serve the zucchini fritters hot, and choose the dipping sauce of your choice. we suggest the Tzatziki sauce.
  • You can make some modifications to the original recipe by adding other veggies to the mix to suit your taste, shredded carrots, for example, just make sure you squeeze out any excess liquid.

A serving of goat cheese delivers 6 grams of filling protein along with a powerful combination of calcium, phosphorus, and copper, these nutrients are essential for healthy bones. Plus, goat cheese provides healthy fats, including medium-chain fatty acids, that can improve satiety and benefit weight loss. If you don’t have goat cheese on hand at the moment, don’t worry, you can use feta cheese or cottage cheese instead, they will still taste great.

HOW TO MAKE ZUCCHINI AND GOAT CHEESE FRITTERS :

Zucchini and Goat Cheese Fritters

Zucchini and goat cheese, the perfect nutritious vegetable side dish.
Print Recipe Pin Recipe
Prep Time 15 mins
Cook Time 15 mins
Total Time 30 mins
Course Side Dish
Cuisine Mediterranean
Servings 8 servings

Ingredients
  

  • 3 medium zucchini about 1½ pounds
  • 2 Large eggs whisked
  • ½  cup Crumbled goat cheese
  • ¼  cup Diced yellow onion
  • ⅓  cup Fresh mint leaves chopped
  • ½  tsp Ground cumin
  • ½  tsp Salt
  • Ground black pepper
  • 1 cup Whole wheat flour
  • Extra virgin olive oil

Instructions
 

  • Shred the zucchini using a large eye grater, over a colander.
  • Squeeze out moisture from the mixture, using a clean kitchen towel, squeeze out as much liquid as you can.
  • Place squeezed zucchini in a medium bowl, beat egg slightly, and add to zucchini, goat cheese, mint, onion, cumin, salt, and pepper to taste.
  • Stir in the whole wheat flour.
  • Heat 1 Tbs oil in a sauce pan.
  • Drop 1/4 cup mounds of zucchini mixture into the hot oil, .repeating to make as many patties as will fit in the skillet, about 4 at a time.
  • Flatten them with the back of a spoon to form pancakes, and spread them about 1/2 inch apart, so they don't stick together, and are easy to turn over and cook until golden brown on both sides and cooked all the way through, 3 to 5 minutes per side.
  • Remove them onto a plate lined with a double layer of paper towel, to absorb any extra oil.

Video

Keyword gluten free zucchini and goat cheese fritters, zucchini and goat cheese fritters, zucchini fritters, zucchini goat cheese fritters recipe
Tried this recipe?Let us know how it was!
May 26, 2022 0 comment
0 FacebookTwitterPinterestEmail
All RecipesBreakfastDessert

PEANUT BUTTER BREAKFAST OATMEAL BOWL

by Foodideo May 24, 2022
written by Foodideo

Nourishing peanut butter oatmeal bowl. A healthy 5-minute breakfast loaded with fiber and protein, topped with fresh fruits, chia seeds and peanut butter.

PEANUT BUTTER BREAKFAST OATMEAL BOWL

You can make this the morning of, or if you’re in a time crunch – make the night prior and reheat in the morning. This nutritious breakfast takes five 5 minutes to make. It’s fiber- and protein-packed, so it’ll keep you full until lunch.  It’s simple, nutritious, and DELICIOUS!

This oatmeal is topped with fresh fruits, chia seeds and creamy peanut butter. Breakfast never tasted so good!

IS OATMEAL A HEALTHY BREAKFAST?

This oatmeal bowl is a healthy breakfast and a great way to start the morning. This oatmeal recipe is high in carbohydrates, but contains whole grains and fruits containing over 11 grams of fiber and 11 grams of protein. This is a great way to put all the fruits in one meal.

How to Make Creamy Oatmeal

The key to a creamy, non-gluey bowl of oatmeal is to use enough water. Cooking oats with milk tends to make thicker, more sticky oats. If desired, you can add almond milk or regular milk splashes to the oatmeal.

Tips for Making Peanut Butter Oatmeal

  • For extra crunches / textures, add your favorite nuts and seeds-these peanut butter oatmeals are very versatile when it comes to toppings.
  • You can replace peanut butter with cashew butter or almond butter.

The great thing about this oatmeal is that it is rich in protein, fiber and antioxidants. All the good things to start your day!it is also an easy-to-make, healthy breakfast.

Healthy Toppings for Oatmeal

The best toppings that you can add to your breakfast oatmeal bowl are fresh fruit, almonds, chia seeds, and peanut butter that I warm in the microwave. But it’s up to you to choose your favorite toppings on your oatmeal bowl! These are some toppings ideas :

Fruit: Banana, raspberries, blueberries, strawberries, blackberries, peaches, figs.
Dried Fruit: Dried cranberries, prunes, dates, cocoa nibs.
Nuts: Almonds, walnuts, pecans, pistachios.
Seeds: Chia seeds, flax seeds.
Sauce: Melted peanut butter, almond butter, or sunflower butter, honey, maple syrup.

How to make peanut butter oatmeal bowl :

PEANUT BUTTER BREAKFAST OATMEAL BOWL

Nourishing peanut butter oatmeal bowl. A healthy 5 minute breakfast loaded with fiber and protein, topped with fresh fruits, chia seeds and peanut butter.
Print Recipe Pin Recipe
Prep Time 2 mins
Cook Time 5 mins
Total Time 7 mins
Course Breakfast
Cuisine American
Servings 1 serving

Ingredients
  

  • 1 Medium banana  sliced
  • 1/3 cup Quick or rolled oats
  • 1/4  cup  Raspberries
  • 1/4  cup  Blueberries
  • 1  tbsp Chopped almonds
  • 1 tsp Chia seeds
  • 1 tbsp Creamy peanut butter melted 30 to 60 seconds in the microwave.

Instructions
 

  • Mash half of the banana with a fork.
  • Combine 2/3 cup water, oats and the mashed banana. then cook over medium heat for about 1 to 5 minutes.
  • Melt the peanut butter in the microwave for 30 to 60 seconds.
  • In a bowl pour the mix and top with the remaining banana sliced, raspberries, blueberries, almonds and chia seeds then drizzle with the melted peanut butter.

Video

Keyword healthy breakfast, oatmeal, oatmeal bowl, oats, peanut butter
Tried this recipe?Let us know how it was!
May 24, 2022 0 comment
0 FacebookTwitterPinterestEmail
Uncategorized

PAPRIKA SMASHED POTATOES

by Foodideo May 19, 2022
written by Foodideo
This is how you can make the best crispy smashed potatoes, seasoned with paprika, garlic powder, and black pepper. Quick and easy recipe for a great appetizer.

PAPRIKA SMASHED POTATOES

This recipe is so simple, you will only need 5 ingredients without counting salt and pepper! The secret to making crispy paprika smashed potatoes is to cook the potatoes twice – at first, you boil the potatoes for about 18 to 20 minutes until they become soft, then you smash them and add seasoning then bake. You will be surprised as to how much crispy, golden and thin the potatoes will turn out to be! This recipe is perfect appetizer and you can even make it with sweet potatoes.

STEP BY STEP TO MAKING SMASHED POTATOES

What’s special about this recipe, is that you can prepare it ahead and then bake it right before you’re ready to eat. You can boil the potatoes a day ahead, then leave the last steps (smashing and baking) for when you want to eat them.  This is how to make these crispy smashed potatoes :

  1. In salted water, boil the potatoes for 18 to 20 minutes
  2. Combine paprika, salt, pepper, and garlic powder then leave them on the side until the potatoes are boiled.
  3. Drain then pat dry the potatoes. (If you’re prepping this recipe in advance, store the potatoes overnight.)
  4. When you’re finally ready to bake the potatoes, take a large glass then gently smash them with it.
  5. Preheat the oven to 425 degrees then line a baking sheet with foil. Place the potatoes on the baking sheet and lightly brush with virgin olive oil.
  6. Sprinkle the seasoning you combined earlier over the potatoes.
  7. Bake for 20 minutes until the smashed potatoes look crispy and golden.

WHAT TO SERVE WITH SMASHED POTATOES

These paprika smashed potatoes make a perfect side dish, it can be paired with proteins and some green veggies. You can serve these potatoes with any sauce that you like, if you want to make a homemade sauce for your french fries or potatoes you can mix: ketchup, mayonnaise, mustard, hot sauce, and apple cider vinegar.

VARIATIONS:

  • Swap baby gold potatoes for baby sweet potatoes.
  • Use the seasoning that you fancy, we suggest fresh thyme, rosemary, parmesan, or lemon zest.
  • If you’re a fan of spicy potatoes add some crushed red pepper or use smoked hot paprika.

HOW TO MAKE SMASHED POTATOES?

PAPRIKA SMASHED POTATOES

This is how you can make the best crispy smashed potatoes, seasoned with paprika, garlic powder, and black pepper. Quick and easy recipe for a great appetizer.
Print Recipe Pin Recipe
Prep Time 5 mins
Cook Time 40 mins
Total Time 45 mins
Course Side Dish
Cuisine American
Servings 4 people
Calories 135 kcal

Ingredients
  

  • 16  oz Baby gold potatoes about 12 - 16 depending on the size
  • Kosher salt
  • 3/4  tsp Sweet paprika
  • 1/2  tsp Freshly ground black pepper
  • 1/4 tsp Garlic powder
  • 1 tsp Extra virgin olive oil
  • Aluminium foil
  • Chopped parsley for garnish

Instructions
 

  • Place the potatoes in a medium pot and cover with cold water, add 1 teaspoon kosher salt, then stir the let it boil for about 18 - 20 minutes. Remove from water and pat dry, gently press using the bottom of a glass to smash the potato.
  • In a small bowl combine paprika, 1/2 teaspoon salt, black pepper and garlic powder. Place potatoes in a single layer on the prepared sheet pan. Lightly brush potatoes with olive oil and sprinkle both sides of each potato with the seasoning mix.
  • Bake 20 minutes, until crisp and golden then garnish with parsley.

Video

Nutrition

Calories: 135kcal
Keyword paprika smashed potatoe, potatoes, smashed potatoes
Tried this recipe?Let us know how it was!
May 19, 2022 0 comment
0 FacebookTwitterPinterestEmail
All RecipesDessert

MOIST CARROT CAKE WITH CREAM CHEESE FROSTING

by Foodideo May 17, 2022
written by Foodideo

This super moist carrot cake recipe made from scratch is perfect for anytime of the year. This cake was made with a can of crushed mango to make it very moist without adding extra fat.

CARROT CAKE WITH CREAM CHEESE FROSTING

This is the perfect cake for your Easter Sunday party. Other Easter or spring dessert recipes. But you can make it anytime of the year.

If you were wondering if carrots really existed in carrot cakes the answer is yes!  What is so special about this carrot cake recipe is that it has coconut flakes and crashed mangos (you can also use crashed pineapple) making super moist and rich of flavor without adding any extra fat.

This carrot cake has been baked in an  an 8-inch round cake pan, it is perfect because it is 3 inches deep  but you can use a bundt cake pan or 13 x 9-inch instead but the baking time will vary. Most carrot cake recipes are lighter because they have much smaller serving sizes

IS IT POSSIBLE TO PUT CARROT CAKE IN THE FRIDGE?

Depending if the cake has frosting or not, cakes will usually keep on the counter 1 to 2 days, or refrigerated 5-6 days. It should be fine to sit on the counter without the frosting in a cool place.

WHAT IS A SUBSTITUTE FOR MANGO?

Mango makes the cake super moist, but pineapple can also be a good substitude.

CAN YOU FREEZE CARROT CAKE WITH CREAM CHEESE FROSTING?

Carrot cake with cream cheese frosting is ideal for freezing.

HOW TO MAKE CARROT CAKE

MOIST CARROT CAKE WITH CREAM CHEESE FROSTING

This super moist carrot cake recipe made from scratch is perfect for anytime of the year. This cake was made with a can of crushed mango to make it very moist without adding extra fat.
Print Recipe Pin Recipe
Prep Time 20 mins
Cook Time 45 mins
Total Time 1 hr
Course Dessert
Cuisine American
Servings 7 servings
Calories 216 kcal

Ingredients
  

  • 3/4  cup All-purpose flour
  • 3/4  cup Whole wheat flour
  • 1 cup Granulated sugar
  • 1/4 cup Flaked sweetened coconut
  • 2 tsp  Baking soda
  • 1 tsp Salt
  • 2 tsp Ground cinnamon
  • 2 tbsp Canola oil
  • 2 Large eggs
  • 1 1/2  tsp Vanilla
  • 2 cups Grated carrots peeled
  • 20 oz Can crushed mango or pineapple in juice drained
  • 1/4 cup Chopped walnuts for topping

For the cake frosting

  • 8  oz  1/3 less fat Philadelphia Cream Cheese
  • 1/4  cup Powdered sugar
  • 1 tsp Vanilla extract

Instructions
 

  • Preheat oven to 350°.
  • Combine flour, sugar, coconut, baking soda, salt, and spices; in a big wbowl then stir well with a whisk.
  • In a medium bowl, combine oil, eggs, and vanilla.
  • Add grated carrots and mango or pineapple, then stir well.
  • Mix the wet ingredients with the dry ingredients. It will be stiff and dry at first but keep folding until it all come together. Then add 1/4 cup chopped nuts to the mix and stir.
  • Spoon batter into an 8" x 3" cake pan.
  • Bake at 350° for about 40-50 minutes, until a wooden toothpick inserted in the center comes out clean and cake is pulling away from sides of pan. Then let it cool completely.
  • For frosting, beat together cream cheese, powdered sugar and vanilla until smooth. Then spread it over top of cake.
  • Garnish with walnuts.

Video

Nutrition

Calories: 216kcal
Keyword carrot cake, carrot cake recipe, low fat carrot cake, moist carrot cake
Tried this recipe?Let us know how it was!
May 17, 2022 0 comment
0 FacebookTwitterPinterestEmail
All RecipesBreakfast

CRUSTLESS BROCCOLI CHEDDAR QUICHE

by Foodideo May 7, 2022
written by Foodideo

Broccoli and cheese are such a delicious combination for quiche, this is a low-carb broccoli and cheddar quiche. The best thing about this quiche is that it’s crustless and very light which makes it a perfect breakfast or brunch (or even a light dinner)!

CRUSTLESS BROCCOLI CHEDDAR QUICHE

In this recipe, you will discover how you can make your quiche crustless.

This recipe is a low-carb version, it is made with no crust unlike the classic quiche, however, we’ve added a lot of broccoli and some half & half cream in that way the eggs can get more of a creamier texture. If you don’t like eating broccoli on its own this recipe is perfect for you, it tastes better in a quiche with cheddar cheese. Broccoli is a nutrient-rich vegetable that may enhance your health in a variety of ways, such as by reducing inflammation, improving blood sugar control, boosting immunity, and promoting heart health. So this is a good way to include it in your diet.

For all the vegetarian lovers, add a salad on the side, then it,s a perfect low-carb, keto, gluten-free and easy lunch.

BROCCOLI QUICHE VARIATIONS:

  • Add ham or bacon while using slightly less broccoli.
  • Instead of using Cheddar cheese, you can try mozzarella cheese or Colby Jack cheese.
  • You can instead of making them in one large pie dish in individual ramekins.
  • If you wish to use a crust, use a deeper pie dish, and use less broccoli.
  • This quiche can be refrigerated from 3 to 4 days. Reheat in the microwave or oven.

Let us know what are your favorite quiche combinations!

Crustless Broccoli & Cheddar Quiche

Low-carb broccoli and cheddar quiche that is light, perfect for breakfast or brunch!
Print Recipe Pin Recipe
Prep Time 10 mins
Cook Time 40 mins
Total Time 50 mins
Course Breakfast, Brunch
Cuisine American
Servings 6 people

Ingredients
  

  • cooking spray
  • 3 cups Chopped broccoli florets
  • 1 cup Grated cheddar cheese
  • 2/3  cup 2% milk
  • 1/4  cup Half & half cream
  • 5 Large eggs
  • 3/4 tsp Kosher salt
  • 1/8 tsp Ground black pepper
  • 1 pinch Freshly grated nutmeg

Instructions
 

  • Preheat the oven to 350 degrees.
  • Spray a pie dish with oil.
  • Microwave the chopped broccoli florets to steam it with 1 tablespoon water until tender crisp and green, for about 2 to 3 minutes.
  • Spread the broccoli evenly in the dish and top it with the grated cheddar cheese.
  • To make the custard mixture, whisk the milk, half and half cream, 5 eggs, salt and pepper, and the nutmeg. Pour the custard into the dish and bake 35 to 40 minutes, until the center is set.
  • Cut the quiche ideally into 6 pieces then serve.

Video

Keyword broccoli cheddar quiche keto, Broccoli Quiche, crustless broccoli cheddar quiche, crustless broccoli cheese quiche, easy crustless broccoli quiche
Tried this recipe?Let us know how it was!


May 7, 2022 0 comment
0 FacebookTwitterPinterestEmail
All RecipesDinnerLunch

JUICY BAKED CHICKEN BREASTS

by Foodideo April 29, 2022
written by Foodideo

This juicy Baked Chicken Breast recipe is topped with crispy panko-parmesan crumbs, a mouth-watering dinner that you will really enjoy.

BAKED CHICKEN BREASTS

The secret behind the juiciness of these Baked Chicken Breasts is before baking the chicken it should be brined in saltwater, then seasoned, and then spread mayo on it. It’s then topped with panko breadcrumbs and shredded parmesan for a crunchy and juicy chicken dinner/lunch that tastes good, you will LOVE it!

This oven-baked chicken is a good dinner idea, what makes it special is the crunchiness of the panko breadcrumbs that we’ve stuck on the chicken breasts with the help of the mayo, instead of breading the whole chicken breast, we just bread the top, which makes it super easy. Then we top it with parmesan.

THE BEST WAY TO BRINE CHICKEN BREASTS

Chicken is great all-purpose meat, but it can dry out easily when you cook it. Keep your chicken from drying out by brining it first.  In case you thought brining chicken is complicated, it is not. Brining chicken is super-easy, A good brine not only adds flavor to lean meats like chicken breasts but also helps keep them juicy no matter how you cook it. Plus, if you brine chicken in lukewarm water, it also helps bring the chicken to room temperature, which makes for more even cooking. This is how you do it :

1. Stir a quarter cup of salt into 6 cups of water.
2. Add your chicken and refrigerate for one to two hours.
3.  Then remove the chicken from the water and pat dry with paper towels.

HOW LONG DOES IT TAKE TO BAKE CHICKEN BREASTS?

Baking the chicken in the oven at 425 degrees for 25 to 30 minutes should be enough. The cooking time varies depending on the thickness of the chicken, we recommend checking the internal temperature of the meat with a meat thermometer. if it reaches 165 degrees, it should be ready.

VARIATIONS:

Protein: You can change the boneless chicken breasts for bone-in chicken breasts or pork. The cooking times will change, so it’s better to just keep an eye on it and check the temperature every now and then.
Spices: you can get creative with the spices to switch up the flavors.  and add spices that you like with your chicken, you can add, for example, chili or onion powder Play around with the spice mixture to switch up the flavors.

JUICY BAKED CHICKEN BREASTS

This juicy Baked Chicken Breast recipe is topped with crispy panko-parmesan crumbs, a mouth-watering dinner that you will really enjoy!
Print Recipe Pin Recipe
Prep Time 5 mins
Cook Time 30 mins
Brine Time 1 hr
Total Time 1 hr 35 mins
Course dinner
Cuisine American
Servings 4 people

Ingredients
  

  • 4 6 oz Boneless skinless chicken breasts
  • Salt
  • 3/4 tsp Garlic powder
  • 1/2  tsp Dried parsley
  • 1/2  tsp Paprika
  • 1 1/2  tbsp Mayonnaise
  • 1/3  cup  Seasoned Panko Breadcrumbs
  • 2  tbsp shredded Parmesan cheese
  • 1  Lemon cut into wedges for serving

Instructions
 

  • Stir a quarter cup of salt into 6 cups of water. (if using table salt, or sea salt, or Mortons, use half)
  • Add your chicken and refrigerate for one to two hours.
  • Remove the chicken from the water and pat dry with paper towels.
  • Preheat oven 425F degrees. Then spray a 9 x 12 baking dish with olive oil.
  • combine 3/4 teaspoon salt, with spice, in a small bowl. Transfer the chicken to the basking dish then rub the spice mix over the chicken.
  • Spread the mayo over the top of each chicken breast then add panko and Parmesan on top. Spray the top with olive oil spray.
  • Bake until chicken breasts reaches an internal temperature of 165 degrees, 25-30 minutes.
  • Slice lemon into wedges and serve with chicken.

Notes

We recommend brining ahead then drain, refrigerate overnight if needed before baking.
Keyword baked chicken breasts, juicy baked chicken
Tried this recipe?Let us know how it was!
April 29, 2022 0 comment
0 FacebookTwitterPinterestEmail
All RecipesAppetizersBreakfastDessert

3-INGREDIENT BANANA OATMEAL COOKIES

by Foodideo April 28, 2022
written by Foodideo

You will no longer worry about those ripped bananas sitting on your counter thanks to these healthy 3 ingredients Banana Oatmeal Cookies, it is a super healthy and delicious yet easy recipe.

HEALTHY 3-INGREDIENT BANANA OATMEAL COOKIES

Unlike the usual cookies, these banana oatmeal cookies are best eaten right after being taken out of the oven. They can be eaten as a healthy snack or dessert or even as breakfast, they are chewy and very tasty.

These banana oatmeal cookies are very chewy and soft, they can be your new favourite snacks, it is best to enjoy them right out of the oven. To make the recipe even easier for you you can make it into a 2-ingredient cookie, using just the oatmeal and bananas, but we recommend adding nuts such as walnuts. Walnuts are an excellent source of several vitamins and minerals. These include copper, folic acid, phosphorus, vitamin B6, manganese, and vitamin E.

VARIATIONS

These cookies taste best when you use ripe bananas since they become sweeter. You can get creative with this recipe and add your favourite ingredients such as cinnamon, almonds, raisins and more.

Our favourite thing about these cookies is that they are egg-free, dairy-free, gluten-free, and vegan.

TIPS

  • The riper the bananas the better, since we are not adding any sugar to the recipe.
  • the leftovers cookies can be frozen. then heated in the microwave before eating.
  • Add a dash of salt to enhance the flavour.
  • Check labels for gluten-free.

HOW TO MAKE BANANA OATMEAL COOKIES

HEALTHY BANANA OATMEAL COOKIES

Mashed bananas, oatmeal and walnuts are the only ingredients you need for these chewy and delicious banana oatmeal cookies.
Print Recipe Pin Recipe
Prep Time 10 mins
Cook Time 15 mins
Total Time 25 mins
Course Appetizer, Breakfast, Brunch, Snack
Cuisine American
Servings 8 people

Ingredients
  

  • 2 Ripe bananas Mashed
  • 1  cup Uncooked oats
  • 1/4 cup Crushed walnuts

Instructions
 

  • Preheat the oven to 350°F.  Spray a non-stick cookie sheet with cooking spray
  • In a bowl, mash the bananas then add the oatmeal then fold in the walnuts and combine all.
  • Place approximately 16 cookies on the cookie sheet.
  • Bake for 15 minutes.

Video

Notes

The leftovers cookies can be frozen. then heated in microwave before eating.
Keyword breakfast cookies, Healthy Banana Nut Cookies, healthy cookie recipe, healthy cookies, healthy oatmeal cookies
Tried this recipe?Let us know how it was!
April 28, 2022 0 comment
0 FacebookTwitterPinterestEmail
Newer Posts
Older Posts

© 2020 - All Right Reserved.


Back To Top